Node.js Tutorial – Day 1: Introduction to Node.js
Welcome to the Node.js Tutorial series! Node.js has become one of the most popular platforms for building fast, scalable, and modern web applications. In this tutorial, we will cover the Introduction to Node.js, explore its features, advantages, installation process, and create your first Node.js program.
By the end of this post, you’ll have a solid understanding of Node.js and be ready to dive deeper into Node.js modules and server-side development.
What is Node.js?
Node.js is a JavaScript runtime environment built on Chrome’s V8 engine that allows developers to run JavaScript outside the browser. Traditionally, JavaScript ran only on the client-side, but Node.js enables server-side scripting, making it possible to build entire web applications with JavaScript.
Some key features of Node.js include:
- Asynchronous and Event-Driven: Node.js handles multiple tasks simultaneously without blocking the main thread.
- Fast Performance: Powered by the V8 JavaScript engine, Node.js executes code at lightning speed.
- Single-Threaded with Event Loop: Efficiently manages concurrent connections using a single thread.
- Rich Ecosystem: Access thousands of packages through Node Package Manager (NPM).
History and Evolution of Node.js
Node.js was created by Ryan Dahl in 2009 to address performance bottlenecks in handling multiple server requests. Since its inception, Node.js has grown into a powerful, open-source runtime used by companies like Netflix, LinkedIn, and PayPal.
Why learn Node.js?
- It allows you to build scalable APIs, web applications, and real-time applications.
- Using JavaScript for both frontend and backend reduces learning curve.
- Its asynchronous architecture makes it perfect for applications with high I/O operations.
Node.js Architecture
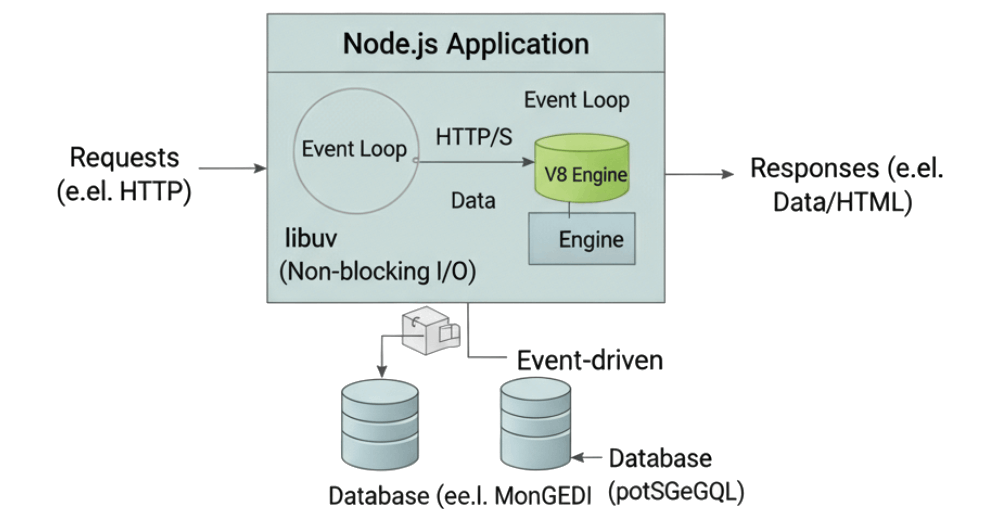
The diagram you see provides a simplified view of how a Node.js application handles requests from a user. The key to understanding Node.js is its single-threaded, non-blocking, and event-driven architecture.
Core Components and Their Roles
- Client-side: This represents the user’s device, like a web browser or a mobile app, that sends a request to your server.
- Load Balancer: Think of this as a traffic cop. Its job is to efficiently distribute incoming requests to multiple Node.js server instances to ensure no single server is overloaded.
- Node.js Server: This is the heart of the application. It’s built with three main components:
- V8 Engine: This is the super-fast JavaScript engine created by Google. It’s the “brain” that executes all your JavaScript code.
- Event Loop: This is the secret to Node.js’s efficiency. It’s a single thread that continuously checks for new tasks. When it encounters a slow operation (like reading a file or querying a database), it hands off the task to another component and immediately becomes available to handle the next request. This is the non-blocking part—it doesn’t wait around for the slow task to finish.
- libuv: This is a powerful C++ library that handles the heavy lifting of asynchronous operations, such as file system and network I/O. It works with the Event Loop, allowing it to hand off I/O requests and then receive the results when they’re ready, without blocking the main thread.
- Database & External Services: These are the external resources your application needs to interact with, like a database (e.g., MongoDB, PostgreSQL) for storing data or other services for things like authentication.
How a Request Flows
- A user’s browser sends a request to your server.
- The Load Balancer receives the request and sends it to one of the available Node.js instances.
- The V8 Engine starts processing the request. If the request needs data from the database, it doesn’t wait. Instead, the Event Loop hands off the database query to libuv and immediately moves on to handle the next incoming request.
- When the database returns the data, libuv notifies the Event Loop that the task is complete.
- The Event Loop takes the completed task and its data and sends the final response back to the user.
This asynchronous, non-blocking approach is what makes Node.js incredibly fast and efficient at handling a large number of concurrent connections. It’s designed for I/O-intensive operations, not for heavy, long-running computations.
For more details about Node.js history and ecosystem, check out the official Node.js website here.
Node.js vs Traditional Server-Side Languages
| Feature | Node.js | Traditional Languages (PHP, Java) |
|---|---|---|
| Execution | Non-blocking, asynchronous | Blocking, synchronous |
| Language | JavaScript | PHP, Java, Python |
| Scalability | Highly scalable | Less efficient for concurrent requests |
| Package Manager | NPM | Composer, Maven |
Node.js is ideal for real-time applications, such as chat apps, live notifications, and streaming services, which are hard to implement efficiently in traditional server-side languages.
Installing Node.js and NPM
Before writing Node.js code, you need to install Node.js and NPM (Node Package Manager).
Step 1: Download Node.js from https://nodejs.org
Step 2: Install and verify by running:
node -v
npm -vIf you see version numbers, congratulations! Node.js is installed and ready.
Pro Tip: Keep Node.js updated for performance and security improvements. For updates, check the Node.js release schedule here.
Your First Node.js Program
Let’s create a simple Hello World program.
- Create a file called
app.js. - Add the following code:
console.log("Hello, Node.js!");- Run the program using:
node app.jsOutput:
Hello, Node.js!This is your first step into the Node.js Tutorial series!
Mini-Project: Hello World Server Using HTTP Module
Next, we’ll create a simple HTTP server in Node.js. Update the app.js file code with below code.
const http = require('http');

const server = http.createServer((req, res) => {
    res.writeHead(200, {'Content-Type': 'text/plain'});
    res.end('Hello, Node.js Server!');
});

server.listen(3000, () => {
    console.log('Server running at http://localhost:3000/');
});- Open your browser and go to http://localhost:3000
- You’ll see: Hello, Node.js Server!
This demonstrates how Node.js handles requests and responses efficiently.
Conclusion
Congratulations! You have completed Day 1 of the Node.js Tutorial. Today, you learned:
- What Node.js is and why it’s popular
- Key features and benefits of Node.js
- How to install Node.js and NPM
- Writing your first Node.js program
- Creating a simple HTTP server
Tomorrow, we will explore Node.js Modules, which allow you to organize and reuse your code efficiently.
Next Lesson Preview: Day 2 – Understanding Node.js Modules
